General questions:
Will my STAPPONE Sensor Soles fit any shoe?
We have taken great care to ensure that your STAPPONE Sensor Insoles will fit most comfortable shoes.
Unfortunately, because shoe fits vary by manufacturer and brand, we cannot guarantee that your STAPPONE Sensor Insoles will fit all of your shoes.
Tip: For maximum comfort, we recommend removing the insole from your shoes beforehand, if possible, and replacing it with your stappone sensor insoles.
Can the STAPPONE Sensor Soles get wet?
Our electronics and sensor technology are installed in such a way that they defy external environmental influences and withstand moisture. Our sensor soles are IP52 rated – this ensures complete protection against contact, protection against harmful dust deposits inside, and protection against water entering at an angle.
Please note that our STAPPONE sensor soles are a high-tech product and must be protected from moisture.
What is our contribution to the sustainability of our products and environmental protection?
Regional value creation is a major concern for us.
All our suppliers have been carefully selected for their core competence, product quality and proximity to our company location in Vorarlberg, in Austria.
We are proud that 100% of our direct suppliers are located in Austria or Germany. This gives us the possibility to react quickly to the needs of our customers and to provide you with a high quality product.
Where can I purchase the STAPPONE sensor soles?
Our STAPPONE sensor soles are currently available in our webshop or you can send us an email to order@stappone.com.
How thick is my STAPPONE sensor sole? Does it interfere with my walking or running?
At its thickest point, the STAPPONE Sensor Sole measures 13mm and at its thinnest point it measures 5mm. Your STAPPONE Sensor Insoles are designed to fit most comfortable shoes. Our tip: For maximum comfort, we recommend removing the insole from your shoes, if possible, and replacing it with the STAPPONE Sensor Soles.
The cork on my sensor soles is cracked. What can I do?
Don’t worry! A small crack does not affect the functionality of this smart and robust sole.
However, we still recommend not to wear the sensor sole in said shoe anymore, as it might lead to increased and larger cracks.
Which chargers do my STAPPONE Sensor Soles need?
The STAPPONE Sensor Soles are charged with inductive chargers. QI is a widely used standard for wireless charging. Current smartphones are also equipped with this technology. With the help of this innovative charging option, your STAPPONE Sensor Soles can be charged very simply by simply placing them on the Sensor Soles. Nevertheless, the STAPPONE sensor soles may only be charged with the enclosed chargers.
How long do my STAPPONE sensor soles need to be charged?
The sensor soles are fully charged and functional after 2 to 3 hours.
How do I know that my soles are charging and when they are done charging?
The charger has two indicator lights on the top – a power light and a status light.
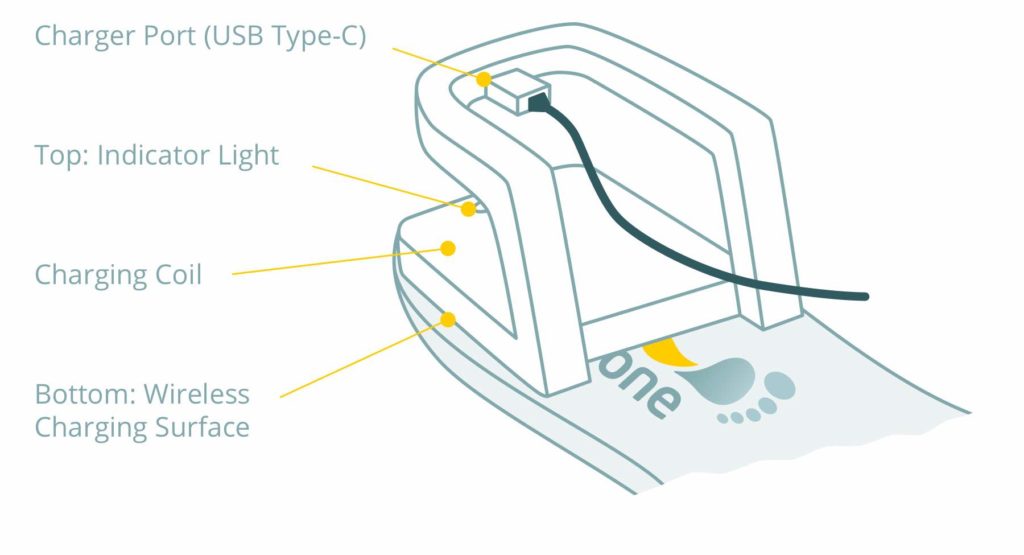
Power lamp
If the power lamp is green, the charger is supplied with power and the sensor soles can be charged. If this lamp does not light up, check the connection to the socket.
Indicator light
 |
A flashing blue light means that the charger is not supplied with sufficient power and the stapp one sensor soles cannot be charged without problems. |
 |
A constant blue light indicates that charging is in progress. |
 |
A constantly illuminated red indicator light signals an error in the process. Please remove the wireless charger from the insole and ensure that there are no obstacles between the wireless charger and the insole. Then align the wireless charger again as before and continue the charging process |
 |
A flashing red indicator light signals that the charger has finished charging due to the high temperature and is cooling down. It is not necessary to remove the charger. This is a safety mechanism and not a cause for concern. |
If the power lamp does not light up, it means that the charger is in standby mode and the sensor sole is not being charged. If the power lamp does not light up even though you have inserted the soles into the charging slot, please align the soles again. The heel area should be pressed completely to the edge so that the sensor soles are optimally placed in the charging slot.
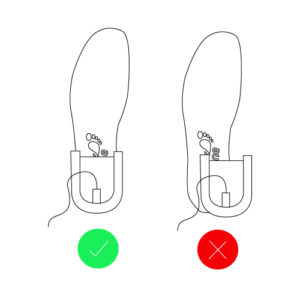
I put the charger on the sensor sole, but the battery does not charge - what can I do?
There can be various reasons why the sensor soles do not charge:
- Check the power supply for the charger.
- Make sure that the charger is placed correctly on the sensor sole.
It is important that the charger is placed flat and centrally on the sensor sole in the heel area (see illustration).
Can I wash my soles?
No, the soles are not washable. Large impurities can be wiped with a dry cloth.
Is STAPPONE a medical device?
Yes, our sensor sole is a medical device class I according to MDD and Austrian Medical Devices Act.
What do I do with the sensor soles when I no longer need them?
If the soles are no longer needed or the end of your loan period is approaching, send them back to us at Ghegastraße 3/1.2, 1030 Vienna, Austria.
Rehab:
What is included in my STAPPONE Rehab order?
→ 1 pair of sensor insoles in the selected size (EU 36-47).
→ Complete access to the Rehab App for Android (download via Playstore)
→ 2 inductive chargers incl. 2 matching charging cables
→ User Manual
→ Quick Start Guide
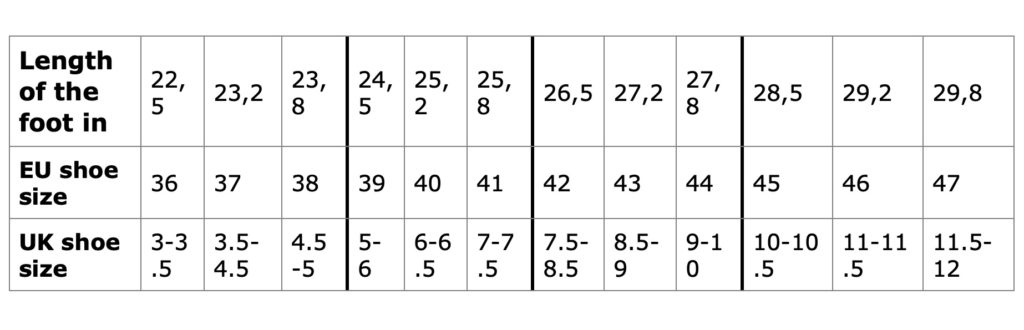
In which size should I order my STAPPONE sensor soles?
Our STAPPONE sensor soles are available in 4 different sizes. These cover the EU unisex shoe sizes 36 to 47.
Take a look at our size chart to get a better overview.
Can I download the STAPPONE Rehab smartphone app from the Playstore?
Yes. The stappone Rehab app is available for download free of charge from the Playstore.
https://play.google.com/store/apps/details?id=com.stappone.rehab
Is it possible to post my progress directly from the STAPPONE Rehab application on Facebook or other social networks?
Yes, it is possible to share the progress with your friends on social networks.
Do I need to have Bluetooth and an internet connection active all the time when I wear my STAPPONE Sensor Soles?
The STAPPONE Sensor Soles need an active Bluetooth connection during the entire activity. If the connection is lost, the activity will automatically end. Active access to the Internet is only required when connecting or calibrating the sensor soles.
Do I have to have my smartphone with me all the time for my data to be recorded?
STAPPONE Rehab requires a continuous Bluetooth connection. The closer you keep your phone with you, the better the Bluetooth connection and therefore less chance of disconnection.
If the connection between the sensor soles and the smartphone is lost, the activity will automatically stop and a report will be generated.
How much does an average delivery of my STAPPONE sensor soles cost and how long does it take?
You can find an overview of our delivery conditions and the delivery time here.
AT: 5€ – DE: 11€ – CH: 15€ (without customs)
Delivery time: AT 2-5 working days – DE 3-6 working days – CH 4-7 working days
AT Express: 16€ – DE Express: 18€ – CH Express: 25€ (without customs)
Express delivery time: Within EU 1-2 days – To Switzerland: 2-3 days
All incl. 20% VAT
How do I use STAPPONE Rehab?
 |
INSERT THE SENSOR SOLE Insert the STAPPONE sensor soles into your shoes. Make sure that the sensor soles are fully inserted into the shoe. If possible, use lace-up shoes where the insole can be removed. Check that the sensor soles have been fully and firmly inserted into the shoes and put the shoes on. |
 |
CONNECTING THE SENSOR SOLES WITH THE SMARTPHONE Now connect the sensor sole via Bluetooth with your smartphone in the STAPPONE Rehab application. To do this, you can read the individual sole ID on the underside of the sole. |
 |
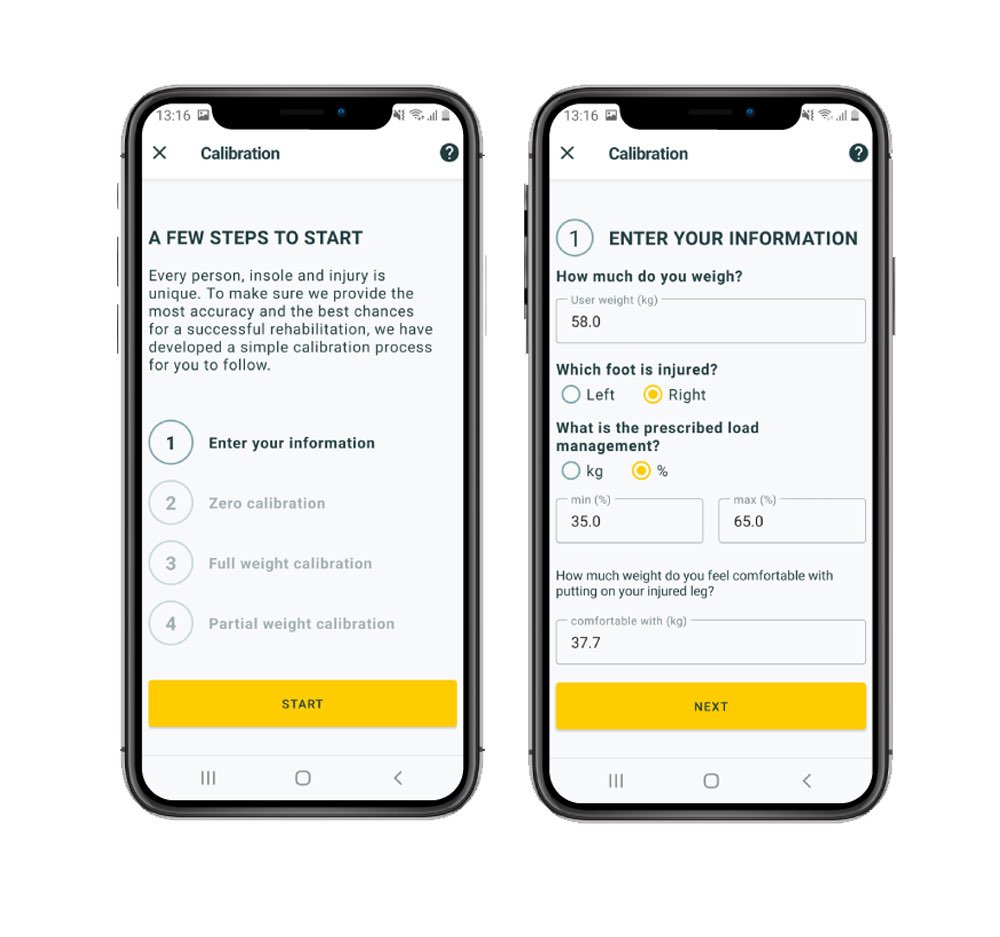
CALIBRATING THE SENSOR SOLES Before the first use, the sensor soles must be calibrated to you and your body weight. The calibration should be renewed after 4 days at the latest. We also recommend that after each calibration you check it before you start. Here you can learn how the calibration works in detail.
|
 |
START YOUR REHABILITATION Start an activity and begin your rehabilitation with STAPPONE Rehab. Under History you can find past activities. |
Why do I need to calibrate my soles?
How does the calibration in STAPPONE Rehab work?
|
Enter information The first step is to enter the body weight and the prescribed partial load. If it is not possible to reach the maximum limit for the calibration (for example, due to pain), you can enter a weight lower than the prescribed partial load under “Loadable with (kg)”.
|
 |
|
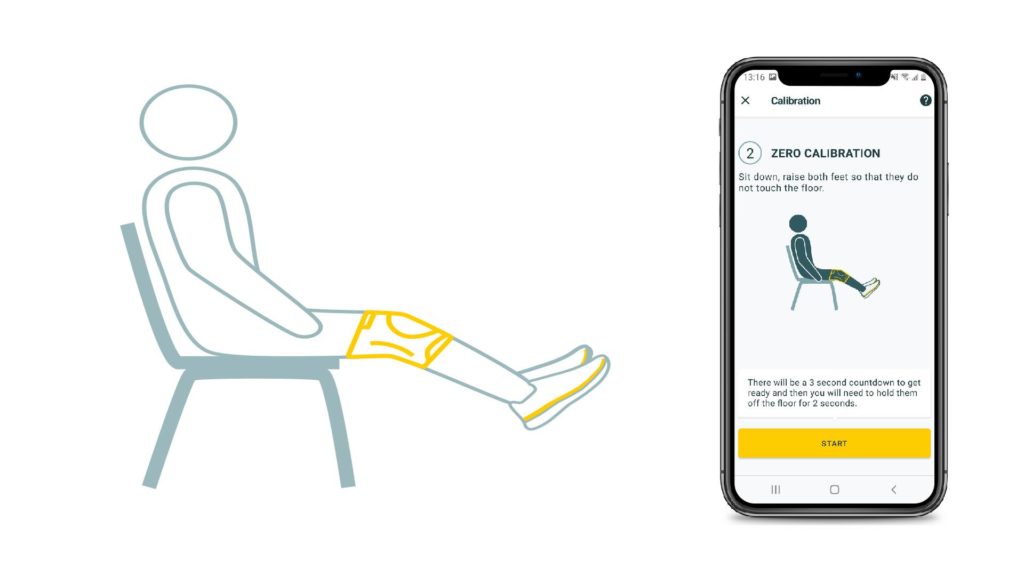
Zero calibration In the next step, the sensor soles must be calibrated to a base value – without load. To do this, both legs must be lifted from the floor and START pressed.
|
 |
|
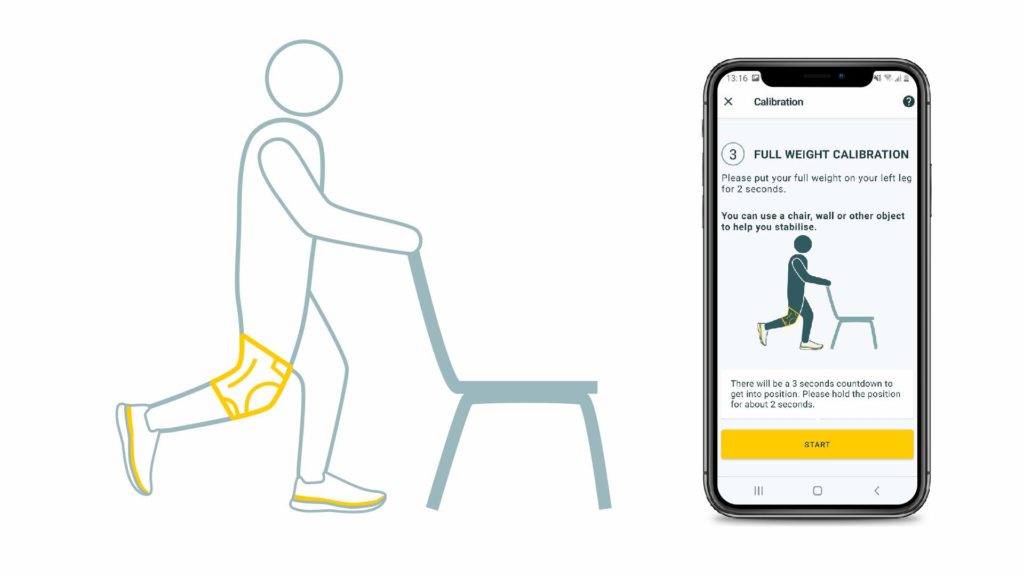
FULL WEIGHT CALIBRATION In the next step, the sole which is fully loaded – using the healthy leg – is calibrated. For this purpose, the corresponding sensor sole must be loaded with the full body weight. Stand on your healthy leg and press START.
|
 |
|
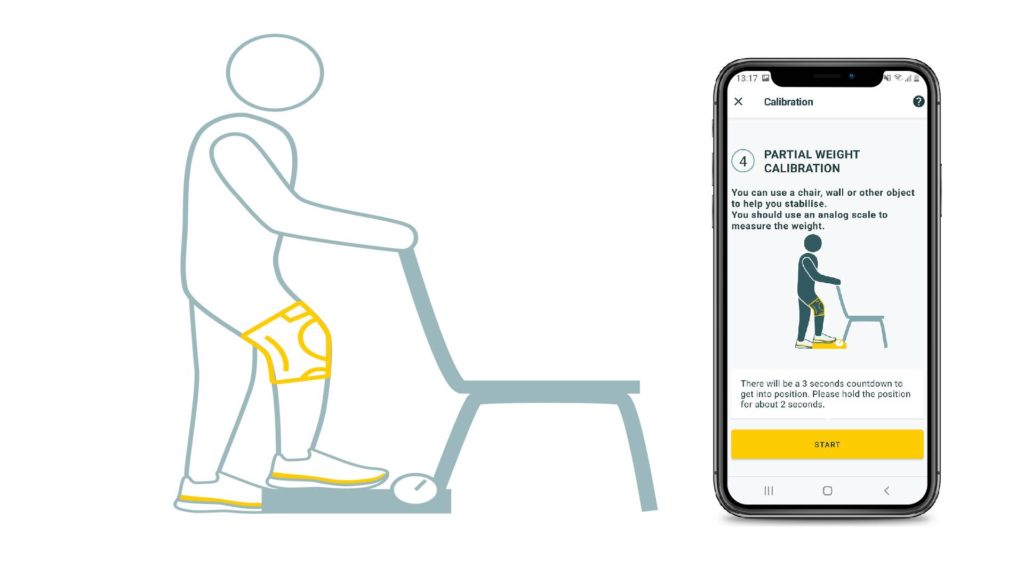
PARTIAL WEIGHT CALIBRATION In the last step, the sole which is partially loaded – injured leg – is calibrated. For this purpose, the corresponding sensor sole must be loaded with the corresponding pre-set weight. Use an analogue scale to load the injured leg accordingly and press START.
|
 |
Note the following safety instructions regarding calibration:
- Calibration is important for the accuracy of your measurement.
- After each calibration, check in an activity whether the calibration was successful.
- The sensor sole is not a scale! The sensor soles provide an accuracy at 20% around the calibration point a maximum deviation of 5% if the calibration was successful.
- The sensor soles allow accurate data according to the above point up to 4 hours of use (wearing the sensor soles). After 4 hours (continuous or not), the soles must be recalibrated.
- We recommend using the sensor soles exclusively in a pair of shoes and not removing the sensor soles from them. Doing so can extend the life of a calibration
I want to connect my sensor soles but I can't find them in the list -what can I do?
There can be several reasons why it is not possible to establish a connection between the insoles and the mobile device.
| To establish a connection between the sensor soles and the smartphone, the sensor soles must be activated. Shake the sensor soles to activate them. | |
| If a connection is still not possible, check the charging status of the insoles. | |
| Place the charger on the surface of the sole in the heel area. Make sure the charger is centred on the sole with the stapp one logo facing up. |  |
Make sure your WIFI or mobile internet is enabled. An active internet connection is required to connect your soles.
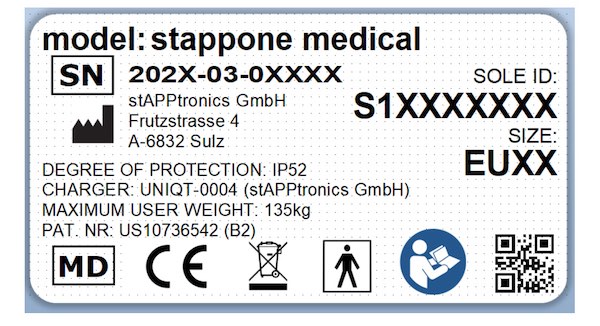
Why do I need a sole ID?
To ensure that the soles shown in the list are yours, you need to know the individual sensor sole ID.
The sole ID is indicated on the product label of your sensor soles. The sole ID of the right sensor sole is needed to connect the sensor soles with the smartphone.
My sensor soles show wrong values ...
If your sensor soles display incorrect data after calibration during activity, it is possible that the calibration process was not performed correctly.
Repeat the calibration and make sure you are using the correct side for the partial load and accurate weight limits.
Side for the partial load and accurate weight limits have been selected.
Try to distribute your pressure load evenly over the sole surface.
Can / do I switch my soles off and on?
No, the sensor soles go into sleep mode by themselves after a certain time. You wake them up by slapping the soles together several times.
What are the minimum technical requirements for my smartphone to use STAPPONE Rehab?
The required Android version is 7.0 or higher. Currently, the STAPPONE Rehab app can only be used on Android devices.
How do I charge my sensor soles?
The sensor soles are charged using induction and the enclosed chargers. These are placed on the top of the sole in the heel area according to the illustration – change the position until the status light turns blue.
More information can be found in the user manual.
Medical/Research/Physio:
What does the STAPPONE Medical / STAPPONE Research / Physio product package consist of?
- 12 pairs of sensor sole size EU 36-47
- Product case with 24 integrated STAPPONE chargers (wireless energy transmission)
- STAPP ONE Research or STAPPONE Medical software for Windows
- Bluetooth Adapter (USB)
What is the difference between STAPPONE Medical, STAPPONE Research and STAPPONE Physio?
The three software systems are very similar in many respects – nevertheless, the STAPPONE products differ primarily in the clinical application area:
STAPPONE Physio is the basic package and has all the basic software functions like e.g. gait analysis. Due to the monthly payment is monthly with a corresponding minimum contract period.
More information about STAPPONE Physio can be found here.
STAPPONE Medical is an extension of the basic package and is mainly used by clinics or rehabilitation centers. More information can be found here.
STAPPONE Research can export patient data in CSV form in addition to the basic functions. Furthermore, STAPPONE Research can adapt the recording frequency as desired (up to a maximum of 62.5Hz). More information can be found here.
Is the position of the dongle important?
It is best to use the dongle by plugging it into the included extension cable. The smaller the distance between the sensor soles and the dongle, the better the connection and the lower the risk of data loss.
My report shows an error message - what should I do?
Please send us a screenshot of the report and a short description of the problem. Send this to support@stappone.com so that we can identify the error and solve it.
I want to connect my sensor soles but I can't find them in the list -what can I do?
There can be several reasons why it is not possible to establish a connection between the insoles and the mobile device.
| To establish a connection between the sensor soles and the smartphone, the sensor soles must be activated. Shake the sensor soles to activate them. | |
| If a connection is still not possible, check the charging status of the insoles. Place the insoles in the corresponding charging slot and make sure that the logo is facing the charger (outwards). Align the insoles inside the charging slot (back and forth) until the status light turns blue. | 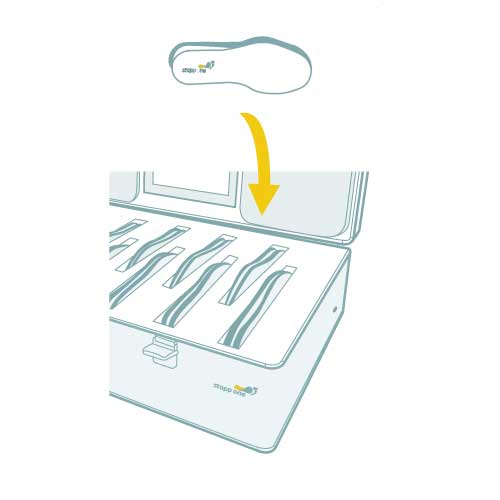 |
I can't connect my sensor soles, what should I do?
The soles are activated by acceleration and pressure – tapping the soles against each other will wake them up from sleep mode. Also, make sure that the soles are charged. While charging, the power light should be green and the status lights should be blue. Make sure that the sensor soles are inserted into the correct charging slot – change the positioning within until the status light turns blue.
Can / do I switch my soles off and on?
No, the sensor soles go into sleep mode by themselves after a certain time. You wake them up by slapping the soles together several times.
When I try to connect my sensor soles, the message "The Left Sole could not be found" is displayed, what can I do?
The left sensor sole cannot be found by your smartdevice at the moment. Please try the following steps in given order:
- the sensor soles go into a sleep state when not in use. You can wake them up by tapping the sensor soles against each other several times. Try to connect again.
- The batteries of the sensor soles may be empty. Please charge the sensor soles by inserting them into the corresponding charging slot in the case. Try to establish a connection again.
If you need personal assistance, please do not hesitate to contact our customer support (support@stappone.com)
I have put my sensor soles in the case - but they still do not charge... what can I do?
Charging is done by means of an inductive charging unit, which is permanently installed in the respective slots in the case. It is therefore important to position them correctly in the charging slot.
- Make sure that the sensor soles are inserted in the corresponding slot.
- The sensor soles must be inserted into the slot with the lateral side facing up and the logo pointing towards the charger.
- The charger has two indicator lights on the top – a power light and a status light – it is important that the status light is blue.
The status lamp in my case lights up red - will my sensor soles still be charged?
Different colored LEDs are installed in the installed chargers to indicate the charging status. Below is a description of what the different colors mean:
|
A flashing blue light means that the charger is not supplied with sufficient power and the stappone sensor soles cannot be charged without problems. |
|
A constant blue light indicates that charging is in progress. |
|
A constantly illuminated red indicator light signals an error in the process. Please remove the wireless charger from the insole and ensure that there are no obstacles between the wireless charger and the insole. Then align the wireless charger again as before and continue the charging process |
|
A flashing red indicator light signals that the charger has finished charging due to the high temperature and is cooling down. It is not necessary to remove the charger. This is a safety mechanism and not a cause for concern. |
If the power lamp does not light up, it means that the charger is in standby mode and the sensor sole is not being charged. If the power lamp does not light up even though you have inserted the soles into the charging slot, please align the soles again. The heel area should be pressed completely to the edge so that the sensor soles are optimally placed in the charging slot.
Can / do I switch my soles off and on?
No, the sensor soles go into sleep mode by themselves after a certain time. You wake them up by hitting the soles together several times.
What are the minimum requirements for my computer?
The STAPPONE Medical, Physio and Research products can only be used on a Windows computer running at least Windows 10.

